In this tutorial, you will learn how to use viewports and shaders to display an outline when a wall hides a character in Godot.
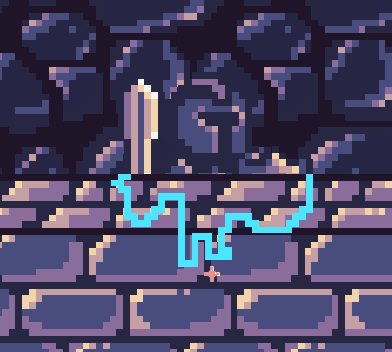
The technique we’ll use here requires GLES3 as we’ll write pixel values higher than 1 to the screen buffer.
To achieve that, we’ll use a viewport and two sprites and shaders to draw the hidden part of an animated sprite as a silhouette and the rest normally.
The trick consists of first rendering your character to a texture using a Viewport node. We then display the texture twice on two stacked sprites. The first one acts as a mask and allows us to detect which parts of the character are visible or not. The second, using a shader, draws a silhouette around the invisible parts.
You can find the open-source demo for this tutorial on our Godot mini tuts repository. There, you’ll find the sprites and resources to follow along this tutorial. We prepared a character and a tileset. Alternatively, you can use any character and level you’d like.
We’ll start by setting up the character scene with a viewport and two sprites. We’ll then use two shaders to render the mask and detect the character’s occluded areas.
Setting up the Character scene
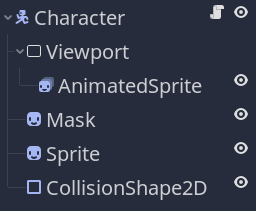
Start by creating a new scene with a KinematicBody2D as the root node named Character.
Add a Viewport node and an AnimatedSprite as a child of it and assign it our guard.png image.
We will use the viewport to render the character’s animations to a texture that we can apply to two sprites we’ll create next.
Add two Sprite nodes to the scene, and name them respectively Mask and Sprite.
Also, add a CollisionShape2D as a child of the KinematicBody2D and in the Inspector, give it a RectangleShape2D.
Your scene should look like this:
Select the Sprite and, in the Inspector, set its Z Index -> Z Index to a high value like 100. We’ll use it to display the silhouette, which we want to render above walls and other objects. That’s why we want to set the z-index so high.
Also, set the offset of both sprites to (0, -16) to align the guard’s feet with the scene’s origin.
Next, let’s configure the viewport. Select the Viewport node and set both its Width and Height to 32.
Make sure to check the Transparent Bg option. Without this, the rendered texture will have a solid background color.
Under the Render category in the inspector, disable HDR and change the node’s Usage to 2D. Also, check the option Render Target -> V Flip, as, by default, the texture will render upside-down.
Lastly, change the Update Mode property to Always. Your viewport’s settings in the inspector should look like this:
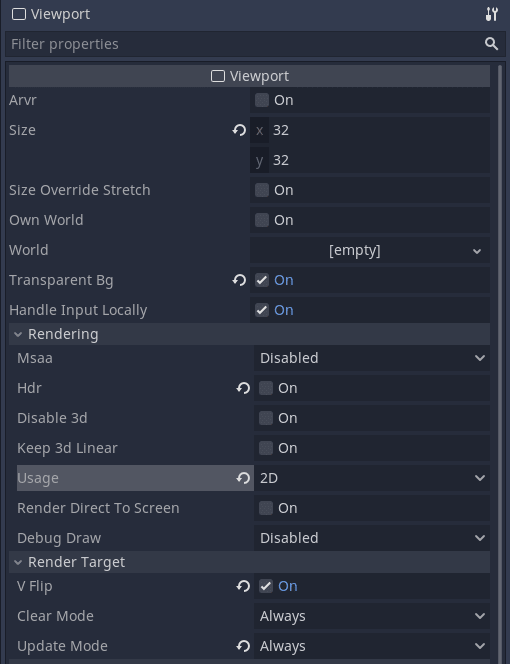
As the viewport’s top-left corner corresponds to the scene’s origin, we need to offset the AnimatedSprite node or it’ll get cropped. Set its Transform -> Position to 16 in both x and y.
You won’t see anything yet, because we need to set what the viewport is rendering as the texture for both sprites. So, for both Mask and Sprite, in the Inspector, set their Texture to a New ViewportTexture and assign the viewport node to that viewport texture. Once you’ve done that, you should see the guard’s sprite.
For testing purposes, I added the following script to the KinematicBody2D node to move it:
extends KinematicBody2D

export var speed := 100.0

onready var animated_sprite := $Viewport/AnimatedSprite


func _physics_process(_delta) -> void:
	# We calculate the input direction and normalize the vector.
	var direction := Vector2(
		Input.get_action_strength("ui_right") - Input.get_action_strength("ui_left"),
		Input.get_action_strength("ui_down") - Input.get_action_strength("ui_up")
	).normalized()

	# And we move the character at a constant speed.
	move_and_slide(direction * speed)

	# We also flip the source animated sprite based on the input direction.
	if direction.x != 0:
		animated_sprite.scale.x = sign(direction.x)
You can save this scene as Character.tscn
Drawing the mask and the silhouette
We will use two shaders to accomplish this effect: one draws a mask to distinguish the parts of the character that are behind an obstacle. The other uses the mask to either draw the character’s texture or an outline of it.
Add a shader to the Mask node with the following code.
shader_type canvas_item;

void fragment() {
	float alpha = texture(TEXTURE, UV).a;
	COLOR.r = 10.0 * alpha;
	COLOR.a = alpha;
}
This shader assigns a value of 10 to the Mask’s red color channel and preserves the input texture’s opacity.
![]()
Why this value? It’s arbitrary, but we use it to detect where the mask is rendering or not. Because it’s so high, in another shader, we can check for pixels rendered to the screen texture that have a high value and render the character there.
Now, add another shader to the Sprite node, with the following code:
shader_type canvas_item;

// Allows you to control the output color in the Shader Params in the Inspector.
uniform vec4 silhouette_color : hint_color;

void fragment() {
	// We sample the screen texture at this point, which has the Mask node's pixels
	// rendered on it.
	vec4 screen_color = texture(SCREEN_TEXTURE, SCREEN_UV);
	vec4 tex_color = texture(TEXTURE, UV);
	COLOR = tex_color;

	// If the pixel's value is lower than the Mask's output color, it means the
	// mask is being occluded, so we draw the silhouette instead.
	if (screen_color.r < 10.0){
		COLOR.rgb = silhouette_color.rgb;
	}
}
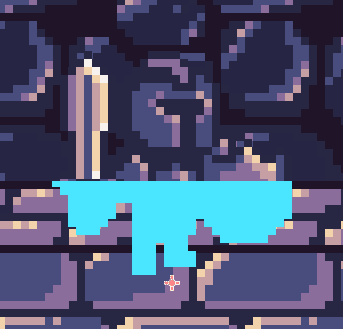
Drawing the complete silhouette feels a bit heavy, doesn’t it? Here’s a variation of that shader that draws an outline instead of a full silhouette. You can find a complete outline shader demo in our open-source Godot Shaders library.
shader_type canvas_item;

// The output color for the outline
uniform vec4 outline_color : hint_color;

void fragment() {
	vec4 screen_color = texture(SCREEN_TEXTURE, SCREEN_UV);
	vec4 tex_color = texture(TEXTURE, UV);
	COLOR = tex_color;

	if (screen_color.r < 10.0){
		COLOR.rgb = outline_color.rgb;

		// We convert the pixel width we want for our outline in decimal texel size.
		vec2 size = vec2(1.0) / vec2(textureSize(TEXTURE, 0));

		// We sample and offset the texture 8 times to draw an outline.
		float alpha = tex_color.a;
		alpha += texture(TEXTURE, UV + vec2(0.0, -size.y)).a;
		alpha += texture(TEXTURE, UV + vec2(size.x, -size.y)).a;
		alpha += texture(TEXTURE, UV + vec2(size.x, 0.0)).a;
		alpha += texture(TEXTURE, UV + vec2(size.x, size.y)).a;
		alpha += texture(TEXTURE, UV + vec2(0.0, size.y)).a;
		alpha += texture(TEXTURE, UV + vec2(-size.x, size.y)).a;
		alpha += texture(TEXTURE, UV + vec2(-size.x, 0.0)).a;
		alpha += texture(TEXTURE, UV + vec2(-size.x, -size.y)).a;

		// If the summed alpha is too high, it means we're over the original texture
		// and we don't want to draw this pixel; it's not part of the outline.
		if (alpha >= 9.0) {
			alpha = 0.0;
		}

		// We then override the texture's color with the calculated outline.
		COLOR = vec4(outline_color.rgb, min(alpha, 1.0) * tex_color.a);
	}
}
To test the effect, we just have to place an obstacle in front of the character. You can instantiate the Character scene in a new scene, put a sprite in front of it and the outline should appear.
![]()
Using the effect in an interior scene
If you download the demo that comes with this tutorial, we prepared a dungeon level to show how this could work in the context of an interior scene.
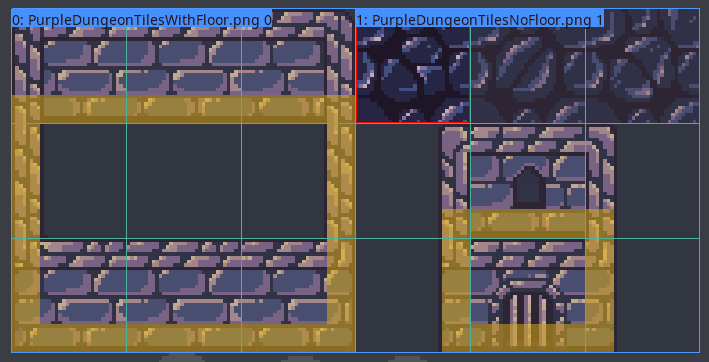
Our scene has both a floor and walls separated into two tilemap nodes: FloorTileMap and WallsTileMap.
The WallsTileMap lives inside a YSort node with the Character.
The reason for this setup is that we need the walls sometimes to render behind the player and other times in front of them. So we need them to be in a tilemap affected by the YSort.
As the floor should always render behind the character, we draw it in a separated TileMap outside above the YSort node in the scene tree.
For the WallsTileMap to render as we expect, I checked the Cell -> Y Sort option in the Inspector, and changed the Cell -> Tile Origin to Bottom Left. As the Guard’s feet are placed at the character’s scene origin, with the tile origin set to the bottom left corner, we ensure that as soon as the character’s feet move above a wall tile’s bottom left corner, the character will render behind the wall.

When setting up the wall tilemap, I made sure to set the collision polygon at the bottom of each wall tile so the player could move behind the walls.
That’s it for an overview of how you’d use the effect.
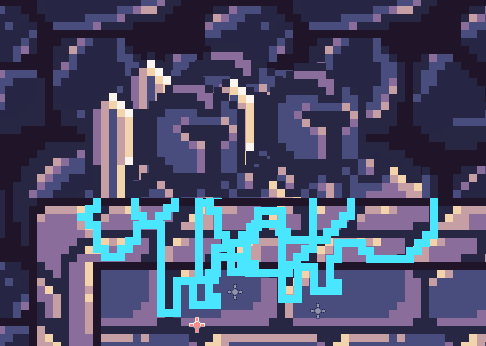
Note that our approach has a limitation: as we draw and render each character’s outline separately, they can overlap.
This isn’t an issue if you use the silhouette shader, but with a transparent outline, you can get overlapping lines as shown below.
There are two options to work around this:
- In the outline shader, instead of drawing transparent pixels inside the outline, output the screen texture’s colors.
- You could render all your game’s characters at once to a single viewport that spans the entire screen and apply the shaders to two full-screen textures that copy this viewport, making this a full-screen post-processing effect.
The second option can give you the most flexibility. We use that kind of setup in our Godot 2D Space Game. It works great on desktop, but note it may be costly on some low-end mobile devices. It’s also a more complex setup where you need to duplicate your characters so they exist both inside your game world and in the post-processing effect layer.
Made by
Our tutorials are the result of careful teamwork to ensure we produce high quality content. The following team members worked on this one:
Tutor
Founder
