In this tutorial, you will learn how to customize a character through a GUI and see real-time results. By the end, you will be able to customize the character’s hat, the head, and sunglasses.
You can download the full project here.
To select the desired textures for each part of the character, we will make a User Interface (UI) that lets the user cycle between the different options. As the code for changing any part is the same, we will make a single scene with the functions to cycle between the available textures. Then we will use three instances of that scene to build the final interface.
Creating a widget to select sprites
Let’s first create a UI component we can duplicate in our menu.
Create a new scene with a Control node as root, and name it UISpriteSelector. Add two Button nodes to the scene and a TextureRect. Name the buttons PreviousButton and NextButton. We will use them to cycle between available textures, and the TextureRect will display the currently selected one. Use the Layout in the toolbar to anchor the PreviousButton on the center left and the NextButton on the center right. Your scene should look like this:
![]()
Add a script to the newly created UISpriteSelector scene.
Before writing code, we should connect the buttons’ pressed signal to UISpriteSelector. For each button, select it, head to the Node dock, and double click pressed. In the newly opened window, click on the Connect button.
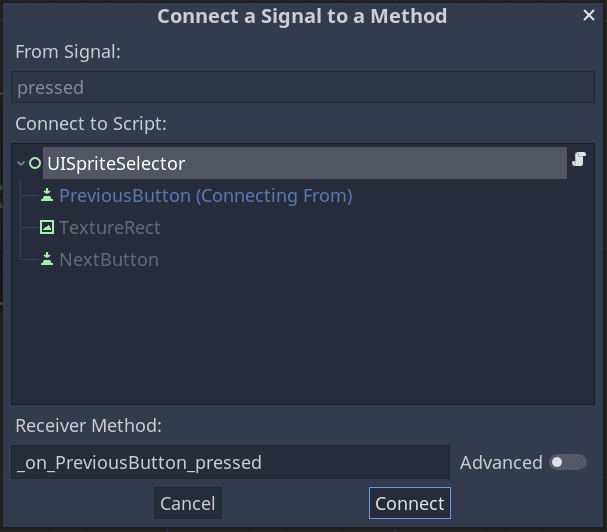
You should see the signal connected like so:
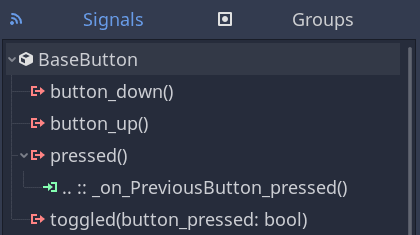
Here’s the UISpriteSelector’s code and how it works:
# Scene with the necessary controls to select a texture for the customization
class_name UISpriteSelector
extends Control

# Emitted when the selected texture changes.
signal sprite_changed(texture)
# We store all available textures to cycle through in this array.
var _sprites := []
# The index of the currently selected texture from the `_sprites` array.
var _index := 0 setget _set_index

# We store a reference to the TextureRect node to update its texture.
onready var texture_rect: TextureRect = $TextureRect

# This function allows another node to pass an array of textures to store in `_sprites`
func setup(sprite_textures: Array) -> void:
	_sprites = sprite_textures
	# We reset the index to update the texture. See `_set_index()` below.
	_set_index(0)


# We use this function to update the _index value and the selected texture.
# We use a setter function because we always want to update the texture when the _index value changes.
func _set_index(value: int) -> void:
	# `wrapi()` cycles the value between the second and the third argument - 1.
	# Here, we use it to cycle between our textures.
	_index = wrapi(value, 0, _sprites.size())
	# The next two lines get and display the newly selected texture.
	var texture: StreamTexture = _sprites[_index]
	texture_rect.texture = texture
	emit_signal("sprite_changed", texture)


# The two callbacks below were generated by Godot.
func _on_PreviousButton_pressed() -> void:
	# When clicking the previous button, we lower the index by one.
	_set_index(_index - 1)


func _on_NextButton_pressed() -> void:
	# When clicking the next button, we increment the index by one.
	_set_index(_index + 1)
The character customization menu
We can use the UISpriteSelector scene created previously to build a menu to customize game characters.
Create a new scene with a Control as its root node. Name it UICharacterCustomizer. After that, add a Panel node to the scene. We are going to use it as a background. Add a VBoxContainer as the Panel’s child. We will add the UISpriteSelector instances as children of this container via code so they automatically stack vertically. Your scene should look like this:
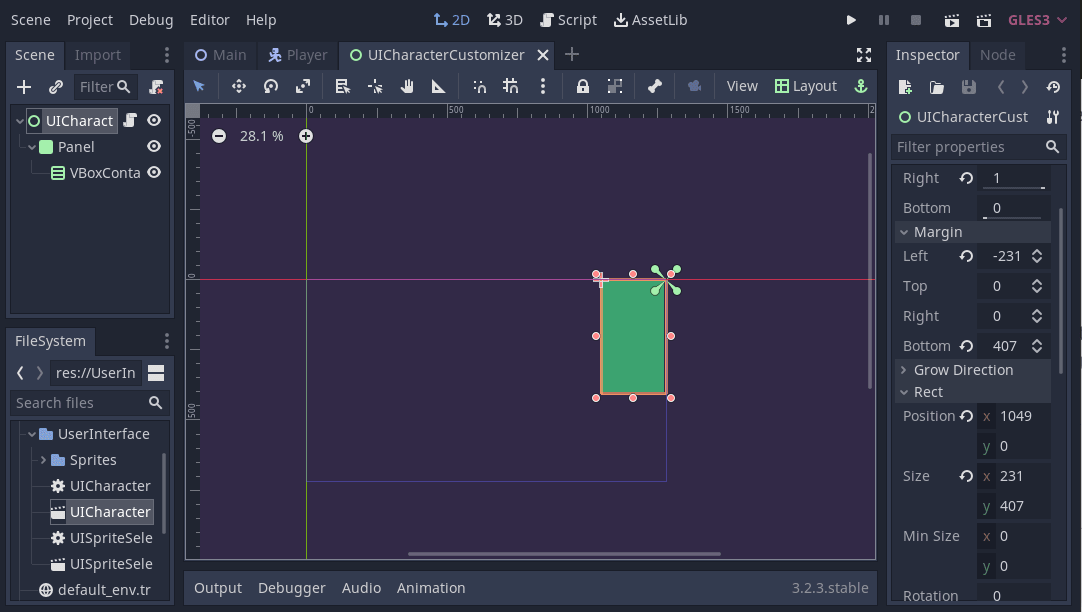
In the image above, we anchored UISpriteSelector in the top-right corner using the Layout menu.
Create a new script for UISpriteSelector.
# This script builds the character customizer GUI, with a `UISpriteSelector`
# for each customizable part.
extends Control

# We're going to have three customizable parts on our character:
# the hat, head, and glasses. We define three corresponding signals.
# Emitted when the user changes the hat texture.
signal hat_changed(texture)
# Same as above, but for the head texture.
signal head_changed(texture)
# Same as above, but for the glasses texture.
signal glasses_changed(texture)

# The `DATA` dictionary contains the possible textures of each part of the
# character. Each key represents a customizable part.
const DATA := {
	"hat" :
	[
		preload("Sprites/hat1.png"),
		preload("Sprites/hat2.png"),
		preload("Sprites/hat3.png")
		],
	"glasses" : [
		preload("Sprites/sun-glasses1.png"),
		preload("Sprites/sun-glasses2.png"),
		preload("Sprites/sun-glasses3.png")
		],
	"head": [
		preload("Sprites/head1.png"),
		preload("Sprites/head2.png"),
		preload("Sprites/head3.png") ]
	}

# We want to instance our UISpriteSelector scene from code so we preload it.
const SpriteSelectorScene: PackedScene = preload("UISpriteSelector.tscn")

onready var vbox_container: VBoxContainer = $Panel/VBoxContainer


# When the node enters the tree, we instantiate `SpriteSelectorScene` for each
# customizable part.
func _ready() -> void:
	for key in DATA:
        # Get the textures available for the current `key`
		var textures: Array = DATA[key]
		# Create an instance of the `SpriteSelectorScene`
		var sprite_selector: UISpriteSelector = SpriteSelectorScene.instance()
		vbox_container.add_child(sprite_selector)
		# We feed the UI widget's textures by calling its `setup()` method.
		sprite_selector.setup(textures)
		# We connect to the `UISpriteSelector`'s `sprite_changed` signal, binding the `key` as an
		# extra parameter, to know which texture changed and emit the corresponding signal.
		sprite_selector.connect("sprite_changed", self, "_on_SpriteSelector_sprite_changed", [key])


# When a texture changes, we emit the corresponding signal, to notify the
# character in the main scene.
func _on_SpriteSelector_sprite_changed(texture: StreamTexture, key: String) -> void:
	emit_signal(key + "_changed", texture)
When calling the emit_signal() function, we use key + "*changed because key corresponds to the part we customized. For instance, if a hat changes, key should be equal to "hat", and hat_changed would be emitted. The texture parameter of this function comes from the signal defined in the UISpriteSelector.
Customizing the character
The only remaining task is making a character to customize. Create a new scene, with a KinematicBody2D node as root, and name it Player. This character should have a sprite for each customizable part. In this case, we will have three sprites: Head, Glasses, and Hat. Build the scene like in the following image.
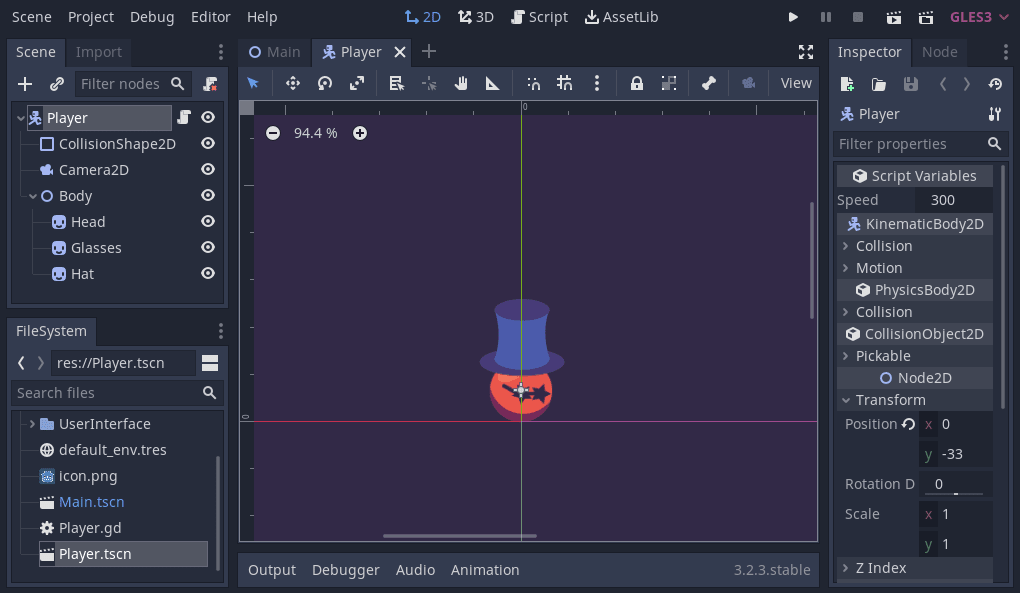
We placed all Sprite nodes as children of a Node2D called Body. With this, we can flip them all at once by flipping Body.
Attach a script to the Player scene.
# Character script with some basic movement, and the functions needed to update
# the sprites of the customizable parts.
extends KinematicBody2D

export var speed := 300.0

onready var body := $Body
# We store references to each customizable sprite, for later use.
onready var hat := $Body/Hat
onready var glasses := $Body/Glasses
onready var head := $Body/Head


# Basic movement is handled here, just for demonstration purposes.
func _physics_process(_delta) -> void:
	var direction := Vector2(
		Input.get_action_strength("ui_right") - Input.get_action_strength("ui_left"),
		Input.get_action_strength("ui_down") - Input.get_action_strength("ui_up")
	).normalized()

	move_and_slide(direction * speed)

	if direction.x != 0:
		body.scale.x = sign(direction.x)


# This functions changes the glasses' texture. It needs to be connected to the
# `glasses_changed` signal of the `UICharacterCustomizer`
func _on_CharacterCustomizer_glasses_changed(texture) -> void:
	glasses.texture = texture


# Same as previous funciton, but for the `hat`.
func _on_CharacterCustomizer_hat_changed(texture) -> void:
	hat.texture = texture


# Same as previous function, but for the `head`.
func _on_CharacterCustomizer_head_changed(texture) -> void:
	head.texture = texture
In the main scene, we will connect the signals emitted from the UICharacterCustomizer scene to the three functions defined above.
Putting it all together in the main scene
Make a new scene from a Node2D, and name it Main. Add the Player and a CanvasLayer to it. Then, add the UICharacterCustomizer scene to the CanvasLayer node. Doing so makes the interface follow the screen.
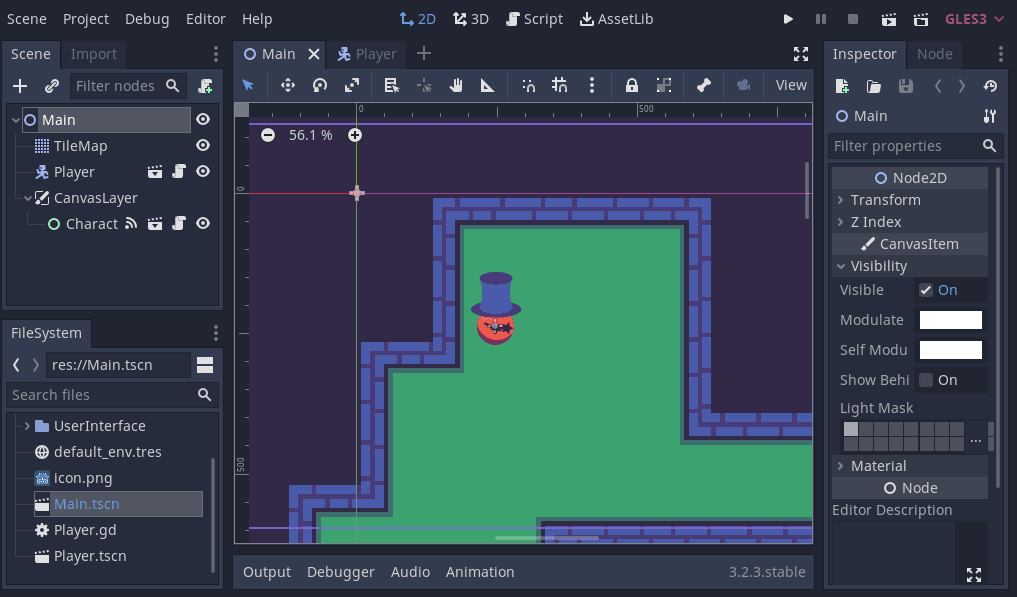
Remember to connect the hat_changed, head_changed and glasses_changed signals from the UICharacterCustomizer, to the matching functions defined in the Player script. This way, when the user changes some texture from the interface, the character sprite will be updated as well.
Made by
Our tutorials are the result of careful teamwork to ensure we produce high quality content. The following team members worked on this one:
Tutor
Founder
