A dive into split-screen co-ops with a shared world
Split-screen co-op games let multiple players enjoy a game together on the same screen, each with their own view of the game world.
This video was made with Godot 3. The guide below has been rewritten for Godot 4.
In split-screen games, we use multiple cameras to render different views of the same game world. Each camera follows a player and renders its view to a separate viewport. These viewports are then arranged on the screen to create the split-screen effect.
In this study guide, you'll learn:
How to set up split-screen using viewports and cameras in Godot 4.
How to assign cameras to different players and render their views to separate viewports.
How to share the same game world between multiple viewports.
What changed in Godot 4
This section is a quick reference for the video above, which was made with Godot 3. Here's what changed in Godot 4:
ViewportViewport is now an abstract class: Use SubViewportSubViewport instead to create viewports that render to textures.
Cameras work differently: There's no Current property on Camera2DCamera2D anymore. Instead, you use the Enabled property in combination with Camera2D.make_current() from code. The same applies to Camera3DCamera3D.
You can now edit viewport children directly in the editor. In Godot 3, you couldn't transform child nodes of a viewport in the editor, which was a major pain point.
Also, the ViewportContainer node was renamed to SubViewportContainerSubViewportContainer.
For this demo specifically, we also made these two improvements:
We use an array instead of a dictionary to store player nodes. This is cleaner since we only have two players.
We enabled the Stretch property on the SubViewportContainerSubViewportContainer nodes so the viewports always fill the available space.
The rest of this guide uses Godot 4 syntax and conventions.
Set up split-screen co-op
Setting up split-screen co-op in Godot is surprisingly simple. You add a SubViewportContainerSubViewportContainer for each player, and inside each container, you place a SubViewportSubViewport and a Camera2DCamera2D.
Then you attach the cameras to the player nodes, set up input mappings for each player, and make sure the game world is shared between the viewports. We'll go over these steps in the next sections.
NOTE:
Head to the download section to download the open-source demo and explore the code.
Splitting the screen
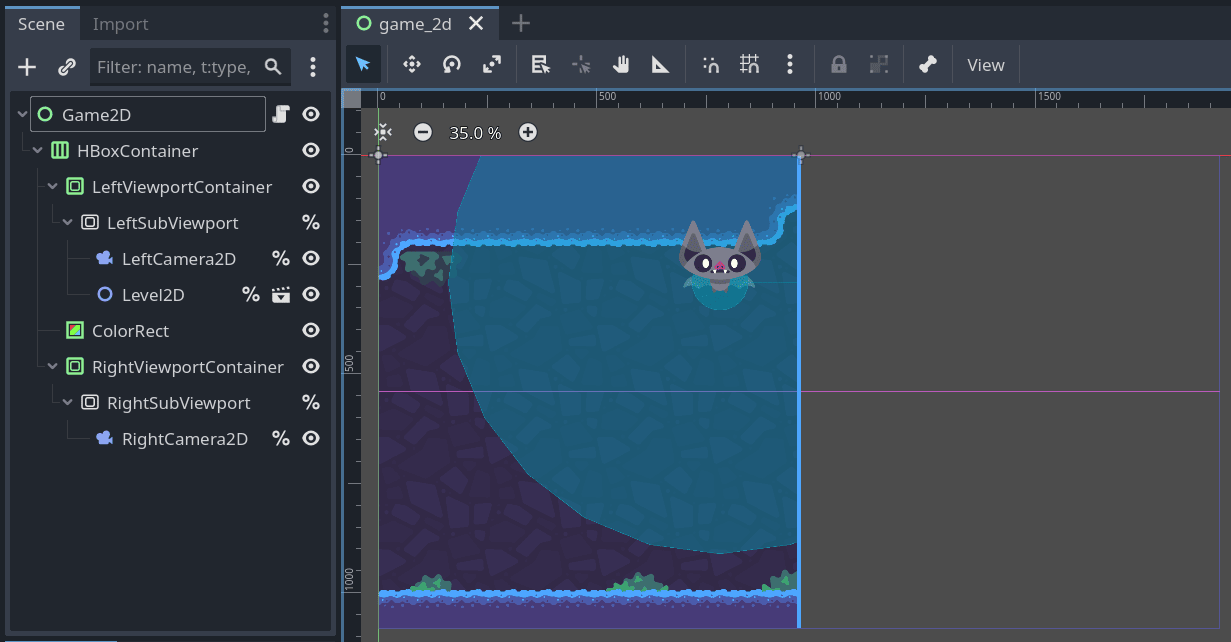
In this demo, we split the screen evenly using a HBoxContainerHBoxContainer. Each player gets a SubViewportContainerSubViewportContainer that fills half the screen.
We also added a ColorRectColorRect in between as a visual divider.
Notice how we added the Level2D scene as a child of one SubViewportSubViewport. In the 2D editor, you can see the game world rendered in one of the viewports only.
To make the two viewports share the same game world, we assign the LeftSubViewport's world_2d property to the RightSubViewport's world_2d property from code.
Finally, we assign a Camera2DCamera2D to each player by making them children of their respective SubViewportSubViewport nodes.
You'll see how we share the world between the SubViewportSubViewport nodes and attach the cameras to the players in the code section coming up.
Mapping player input
First, you need to define the input map for each player. You can use any input scheme or controllers you prefer, but in this demo, we went with the following:
Next, we need to connect these input actions to each player node. To do this, we create a custom Resource class called PlayerControls. This class stores the input action names for a player:
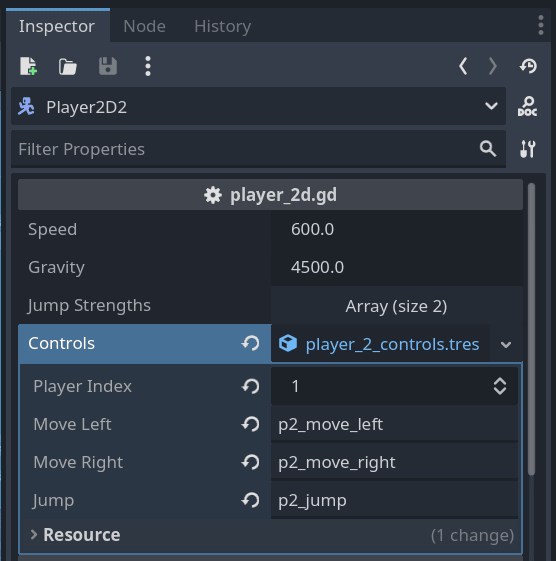
Now we create the actual PlayerControls resources. We make two of them, one for each player, and save them as res://character/player_1_controls.tres and res://character/player_2_controls.tres.
The default values are for player 1. For player 2, we change the player_index to 1 and update the input action names in the Inspector.
Putting everything together in code
Let's put everything together with some code in the main scene's script.
We start by defining an array of dictionaries to hold references to each player's SubViewportSubViewport, Camera2DCamera2D, and player node:
extendsControl# We need to:# 1. Share the world of the first viewport with the second viewport.# 2. Create a remote transform attached to each player that pushes their position to the camera.# This data structure helps us to do that conveniently. See the _ready() function below.@onreadyvar players:Array[Dictionary]=[{
sub_viewport =%LeftSubViewport,
camera =%LeftCamera2D,
player =%Level2D/Player2D1,},{
sub_viewport =%RightSubViewport,
camera =%RightCamera2D,
player =%Level2D/Player2D2,},]
This makes our _ready() function clean and straightforward. We loop through each player's info to set up the shared world and attach the cameras to their players using remote transforms:
func_ready()->void:# The `world_2d` object of the Viewport class contains information about# what to render. Here, it's our game level. We need to pass it# from the first to the second SubViewport for both of them to render# the same level.
players[1].sub_viewport.world_2d = players[0].sub_viewport.world_2d
# For each player, we create a remote transform that pushes the character's# position to the corresponding camera.for info in players:var remote_transform := RemoteTransform2D.new()
remote_transform.remote_path = info.camera.get_path()
info.player.add_child(remote_transform)
Now let's see how we use our custom PlayerControls resource.
These are the relevant parts of the res://character/player_2d.gd script:
extendsCharacterBody2DextendsCharacterBody2D# ...# ...@exportvar controls: PlayerControls = null
@exportvar controls: PlayerControls = null
func_ready()->void:# Disable the player if we don't assign a `PlayerControls` resource to# the `controls` variable to prevent a crash.if controls == null:set_physics_process(false)func_physics_process(delta:float)->void:var horizontal_direction := Input.get_axis(
controls.move_left, controls.move_right
)
velocity.x = horizontal_direction * speed
velocity.y += gravity * delta
var is_jumping := Input.is_action_just_pressed(controls.jump)var is_jump_cancelled :=(
Input.is_action_just_released(controls.jump)and velocity.y <0.0)# ...
By using the controls variable instead of hard-coding input action names, our player script can work with any player's control scheme.
faq/troubleshooting
Why isn't my SubViewport filling up the entire SubViewportContainer?
Make sure you enabled the SubViewportContainerSubViewportContainer's Stretch property in the Inspector. This makes the SubViewportSubViewport child node always fill the available space in its container.
Why not add RemoteTransform2D nodes in the editor instead of code?
We could have added the RemoteTransform2DRemoteTransform2D nodes directly in the editor, but since we created the level as a separate scene, it's cleaner to add them through code.
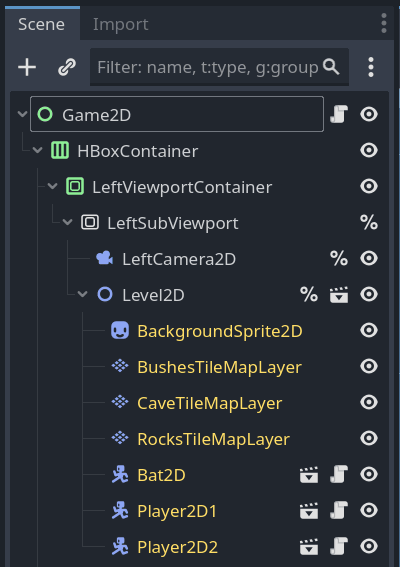
This prevents us from expanding the Level2D node by using the Editable Children feature in the Scene dock as in the following image:
As a general rule, I recommend against using Editable Children. It can cause you to lose changes on the expanded children if you update the parent scene later on.