This guide is a Godot 4 update to a popular video tutorial on coding mêlée attacks using hitboxes and hurtboxes, (originally recorded using Godot 3).
Since some things are done a little bit differently in Godot 4, you can watch the video without trying to repeat the steps verbatim, just to get the general idea.
The study guide that follows and the associated demo project, including the code and assets, are all up-to-date and compatible with Godot 4.5 or later. You can directly skip to the updated guide if you feel you don't really need the video.
Nathan
Founder and teacher at GDQuest
If you're watching this video for reference, here's a list of the main differences you can expect to see in the updated Godot 4 demo!
Renamed hitbox and hurtboxes: In the updated demo project, we decided to rename them HitArea2D and HurtArea2D respectively, as a reminder that they are in fact Area2D nodes.
Annotations over keywords: To make a property available in the editor in Godot 4, we now use the @export annotation instead of the export keyword. We also use @onready instead of the onready keyword to initialize a variable when the node is added to the scene tree.
Custom icons: We added custom icons to the hitbox and hurtboxes using the @icon annotation. Those appear in the scene tree and when you search for a node. This step is optional and not shown in the video. (In Godot 3, we used to declare an icon like this: class_name MyClass, "res://path/to/optional/icon.svg").
Signal connections: Signals and functions are now first-class citizens. We connect signals using objects, like area_entered.connect(_area_entered), instead of plain strings like: connect("area_entered", self, "_on_area_entered"). This gives you better autocompletion, error detection, and lets you connect to any function, including lambdas.
_ready() instead of _init(): In the updated demo, you will notice we removed the _init() function definitions in favor of using _ready(). This makes it clearer that the assignments happen when the node is added to the scene tree, and it's a more familiar function for Godot users.
NOTE:
On collision detection in Godot 3 vs Godot 4
In Godot 3 collision detection worked both ways even when you didn't want it to. Let's say you had a player looking for collectible coins. The coins would also be scanning for the player by default. Whereas in Godot 4, an object only detects collisions if it's actively set to look for them through its collision_mask. This means collision detection can work in one direction only, which is both more intuitive AND more efficient!
Using hitboxes and hurtboxes in Godot 4
In many games, dealing and taking damage is part of the core gameplay loop. To set this up, we use areas that are conventionally called hitboxes and hurtboxes.
Hitboxes are the areas you place on or around weapons or enemies to define the parts that deal damage (what parts can "hit" other things).
Hurtboxes are the areas you place on or around characters or objects to define where they take damage (what parts can be "hurt" by other things).
We usually create dedicated physics shapes to represent hitboxes and hurtboxes for each character or entity that can deal or take damage.
In Godot, we implement them using Area2DArea2D nodes for 2D games and Area3DArea3D for 3D games because they detect overlaps without affecting physics. This means your character will detect the impact but it won't get pushed around by it.
Setting up collision layers and masks
First, I recommend downloading the demo project to explore the code and see how it works. There are two important scenes in the demo:
res://sword/sword_2d.tscn: this is the player weapon that has a hitbox that can damage enemies.
res://enemy/enemy_2d.tscn: this is the enemy that has a hurtbox that can be damaged by the weapon.
In this demo, we named physics layer 1Game World and physics layer 2 as hitboxes.
Collision layers tell Godot what layer an area is on. Collision masks tell Godot which layers an area should look for.
Here's how we set up our two types of areas:
HitArea2D is our hitbox. It represents the area that deals damage. It doesn't detect anything itself so we set its collision_mask to 0. But it can be detected by other areas on layer 2 so we set its collision_layer to 2 (hitboxes).
HurtArea2D is our hurtbox. It represents the area that can receive damage. It can detect hitboxes on layer 2 so we set collision_mask to 2. But other areas can't detect it so we set its collision_layer to 0.
You may also want hitboxes to detect when they hit something, for example, to play a different sound or visual effect depending on what they hit.
In that case, you can put hitboxes and hurtboxes on different layers and masks and make them detect each other.
Nathan
Founder and teacher at GDQuest
What's the benefit of making the hurtboxes listen for collision rather than the hitboxes?
It allows each character or enemy to manage what happens when it takes damage and how much health it has. Different enemies could have different resistances, status effects, knockback, etc. That's why in large game projects, you will often want to put your damage code on the receiver's end like this.
Coding the hitbox
In our demo, the player has a sword that attacks the enemy.
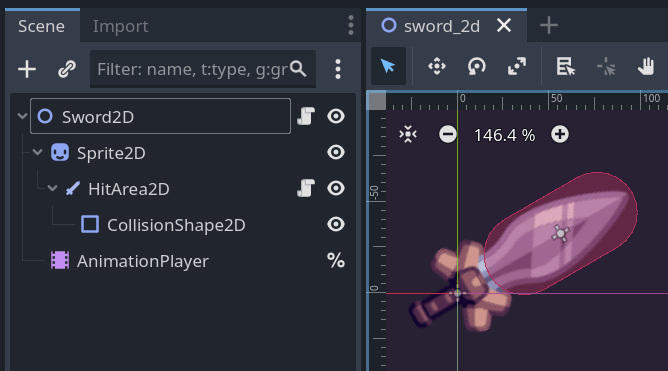
You can see in the scene tree that Node2DSword2D has a HitArea2D node (with a custom icon!) as a child of the Sprite2DSprite2D node. This way, the hitbox rotates with the sprite when the attack animation plays.
The hitbox carries the damage information. Here's the code for our HitArea2D class:
By making damage an export variable you turn it into a property that can be changed directly in the editor without touching the code. This is very practical for reusing the hitbox to set up different weapons or weapon upgrades.
Since the hitbox doesn't need to detect anything in this case, we can turn off its Monitoring property. This means that regardless of what is in its collision mask, the area won't emit any signals.
Turning off collision masks, monitoring and monitorable properties, or disabling collision shapes (when it makese sense to!) is a good way to improve physics performance.
If you don't do that, Godot will check for collisions even when you don't need the results and that can quickly get costly the more entities you have.
Nathan
Founder and teacher at GDQuest
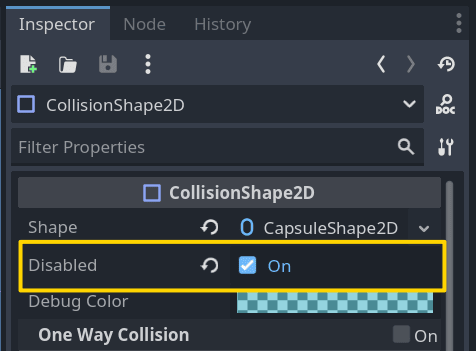
Finally, since we only want the hitbox to be active during the attack animation, we check the Disabled property on the CollisionShape2DCollisionShape2D. That way you won't damage enemies by just walking into them.
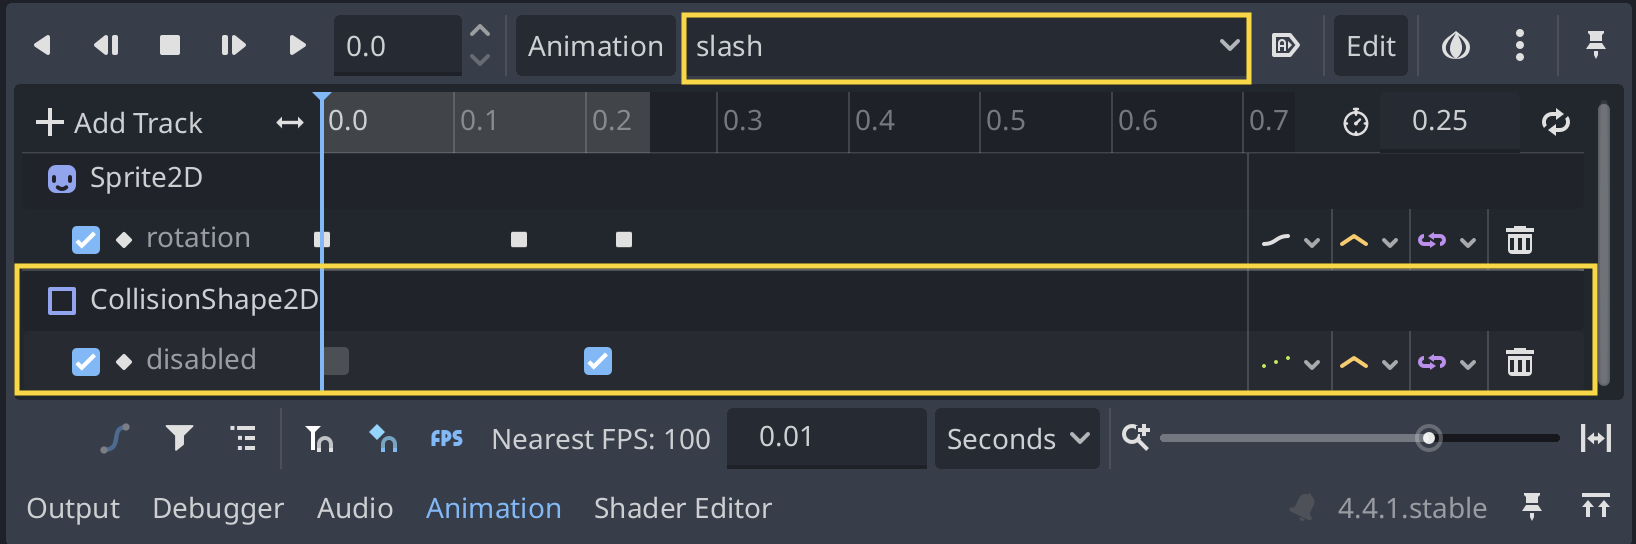
Instead, we enable the CollisionShape2DCollisionShape2D directly in the animation player.
If you inspect the animation player, you can see it has 2 tracks, reset and slash. In the slash track, we uncheck the Disabled property on the CollisionShape2DCollisionShape2D only during the part of the animation that corresponds to the attack.
Coding the hurtbox and using it as a component
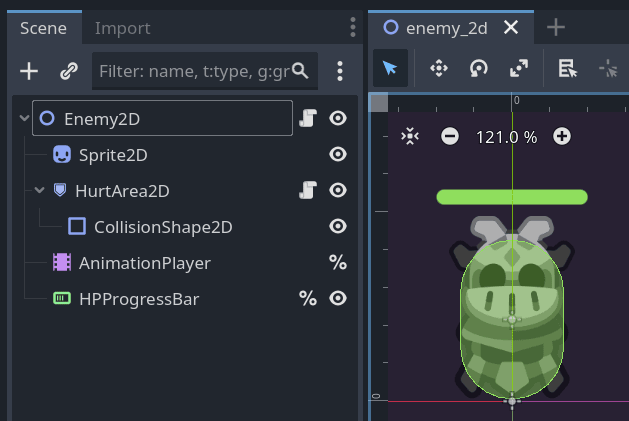
In our demo, the enemy takes damage from the sword.
You can see in the scene tree that Node2DEnemy2D has a HurtArea2D node (again with a custom icon!) as a child of the Sprite2DSprite2D node. This way, the hurtbox moves and rotates with the sprite as the enemy moves.
The hurtbox connects to the area_entered signal. When a hitbox enters, it calls take_damage() on the owner:
Here, I've used what we call "duck typing": any scene with a HurtArea2D child can react to damage as long as it has a take_damage() method.
The owner property is a reference to the root of the scene that contains the HurtArea2D. It's a convenient way to access the scene's root node and make it work as a component, independently of the scene's structure.
How come you can use HitArea2D as a parameter type?
The area_entered signal passes an argument of type Area2DArea2D to the connected function, so the function must accept a matching Area2DArea2D type as a parameter.
Instead of Area2DArea2D, we can use any parameter type that extends Area2DArea2D, like our custom HitArea2D.
This gives us two benefits:
It helps filter out other Area2DArea2D nodes. If the area that entered is not an instance of HitArea2D, the function will still be called, but hit_area will be null.
We get code completion on the hit_area parameter.
It's equivalent to writing the connected function like this, using the as keyword to cast the Area2DArea2D to a HitArea2D:
func_on_hit_area_area_entered(area: Area2D)->void:var hit_area := area as HitArea2D
if hit_area != null:take_damage(hit_area.damage)
NOTE:
This doesn't work the other way around. If we tried to connect the signal to a function that expects a more generic type, like Node2DNode2D, it would break because Node2DNode2D is too general and doesn't match the expected signature of the signal.
faq/troubleshooting
Why would I use separate hitboxes and hurtboxes?
Not all games need hitboxes and hurtboxes separate from character physics: in a platformer, in order to take damage, the player's CharacterBody2DCharacterBody2D would just need to detect collision with the enemy's CharacterBody2DCharacterBody2D.
Hitboxes and hurtboxes become necessary for games with more complex combat mechanics. One of the most common use cases is when a character can take damage to multiple body parts, like a headshot or a leg shot. For that, you need different physics entities for each body part. Depending on the part that gets hit, you can apply different damage amounts or cripple the character.
How many hitboxes you need depends on the combat mechanics of your game. A sword swing, for example, can be a single hitbox that can hit one or multiple hurtboxes.
If combat mechanics are central to your game, you'll often need many hitboxes and hurtboxes that you'll want to tweak often during development. For this reason, it's useful to implement them in a way that makes it easy to add, remove, and adjust their properties separately from movement physics.
What should be the size of my hitboxes and hurtboxes?
The size of your hitboxes and hurtboxes is a design choice that depends on your game. For example, in single-player games, you might make enemy hurtboxes to be larger than their sprites to make them easier to hit.
At the same time, you could make the player's hurtbox smaller than the sprite to make attacks easier to dodge. This makes the game more forgiving and fun for the player.
download files
This demo project was created with Godot 4.5 and should be usable for any Godot 4.x version.
Import the zip file in Godot 4.5 or later to explore the code and see how everything works together.
bonus
Wait, how do I add a custom icon to a script?
It's pretty easy! You can create a simple vector shape in any software that supports vector creation like Inkscape or Adobe Illustrator or even Figma. Remember to keep the shape simple enough that it can be recognizable at a small size. Then save it in your project folder and add it to your scripts using @icon:
@icon("res://path/to/class/your_own_icon.svg")
In the demo project, you can see we did this for both the HitArea2D and the HurtArea2D scripts. There is no path in our case because we placed the .svg files next to the scripts in the project folders.
Master mêlée and ranged attacks with different enemies!in GDSchool
In Module 10 of Learn 2D Gamedev From Zero and Module 4 of Learn 3D Gamedev, you become able to set up your projects and code mêlée and ranged attacks including different types of enemies, on your own without depending on tutorials.
Nathan
Founder and teacher at GDQuest
Module 10 Lessons 1-9Learn 2D Gamedev From Zero with Godot 4
Module 3 - Lesson 8Learn 3D Gamedev From Zero with Godot 4