Your First 3D Game With Godot
Welcome! This free beginner Godot course will teach you how to code your first complete 3D game, step-by-step, from start to finish.
You will learn how to create a 3D FPS arena survival game with a player character that can move, jump, and shoot, and enemies that chase and push you off the platforms. You will also learn how to create a level, add sound effects, and export the game to share it with others.
This video series is for people who are new to Godot and gamedev and want to get their feet wet.
To fully understand the code, it's helpful to know a little bit of coding. Any language will do. If you're completely new to coding, you can check out our free web app: Learn GDScript From Zero. It'll introduce you to GDScript, the programming language we use in this video series.
Bear in mind that when you learn Godot's GDScript, you're not stuck with it! Your coding knowledge is transferable to any other programming language like C#. We teach GDScript because it's particularly easy to pick up and it's well-integrated in Godot, so it's a great way to get started.
Nathan
Founder and teacher at GDQuest
This video comes with two zip files:
- The workbook version contains the assets. You need to follow along with the video and create the game yourself, step by step.
- The solutions version contains the finished code and code checkpoints. If you're stuck at some point and the troubleshooting points below do not answer your question, you can open the solution project in Godot and compare your scenes and scripts against it.
Below each video, you will also find a folded code reference to check your scripts against without having to leave the page.
- Turn off type hints in the project settings to follow along
GDScript, the game scripting language we use in this tutorial, has an optional syntax called type hints. It's a way to tell the computer what type of data a variable or a function uses (a number, text, a node, etc.). By default, type hints are turned on in Godot 4.
So when you type
func _processin a script, Godot will automatically add type hints by default:func _process(delta: float) -> void:In this beginner tutorial, we don't use type hints to keep the code simple and easy to follow. If you have type hints enabled in your project settings, you can turn them off to follow along with the videos.
Go to Editor
Editor Settings... (on macOS, instead, go to Godot Editor Settings... ), search for "Type hints", and in the Text Editor Completion section, uncheck the Add Type Hints option. You can enable it again after completing the tutorial.
1. Setting up
- Video links
- Our interactive App to Learn GDScript
- Download Godot at godotengine.org/download
- The assets you need are available in the Download section below.
- When I run the scene, I don't get the same scene playing as you do
The scene that plays when you click the Play Main Scene button or press f5 (on Mac: ⌘b) is the project's main scene. If you see a different scene playing than the video, it means that your project's main scene is set to run a different scene file.
There are two common ways to change the project's main scene:
- Using the scene tabs above the viewport
- Using the FileSystem dock
You can also look for a scene file (a file that ends with ".tscn") in the FileSystem dock, right-click it, and select Set as Main Scene. You will see the filename turn blue to indicate that this scene is the one that will run when running your project.
- In this clip, I search for the level scene in the FileSystem dock and set it as the main scene
Checkpoint
At the end of this section, you should be able to verify that:
In the player scene, the CharacterBody3D node has its Transform
2. Coding the camera rotation
- I get an error that says 'null instance'
If you see an error message like this when running the game: Invalid access to property or key 'rotation_degrees' on a base object of type 'null instance'., it means that the engine could not get the node you're trying to access.
In this example, this error could occur on this line:
%Camera3D.rotation_degrees.x -= event.relative.y * 0.2We're trying to change the Camera3D node's rotation, but the engine can't find the Camera3D node.
There are two common causes for this error:
- In the scene, the camera node is not marked with the Scene unique name symbol. To use the
%shortcut in the script, the node must have a unique name in the scene. Right-click the node in the Scene dock and select Access as Unique Name. - In scripts, you access nodes by name, not by their type. The name of the node in the Scene dock and in the script must match exactly. If the node in the scene is named Camera3D, the script must access it with
%Camera3D. If instead you rename the node to PlayerCamera, you must change the script to%PlayerCamera.
- In the scene, the camera node is not marked with the Scene unique name symbol. To use the
Checkpoint
In the player scene, the root Player node's Transform
- Code Reference: res://player/player.gd
Here's the complete code for the script at the end of part 2:
extends CharacterBody3D


func _unhandled_input(event):
	if event is InputEventMouseMotion:
		rotation_degrees.y -= event.relative.x * 0.5
		%Camera3D.rotation_degrees.x -= event.relative.y * 0.2
		%Camera3D.rotation_degrees.x = clamp(
			%Camera3D.rotation_degrees.x, -60.0, 60.0
		)
3. Limiting the mouse
Checkpoint
- Code Reference: res://player/player.gd
Here's the complete code for the script at the end of part 3:
extends CharacterBody3D


func _unhandled_input(event):
	if event is InputEventMouseMotion:
		rotation_degrees.y -= event.relative.x * 0.5
		%Camera3D.rotation_degrees.x -= event.relative.y * 0.2
		%Camera3D.rotation_degrees.x = clamp(
			%Camera3D.rotation_degrees.x, -60.0, 60.0
		)
	elif event.is_action_pressed("ui_cancel"):
		Input.set_mouse_mode(Input.MOUSE_MODE_VISIBLE)
4. Coding ground movement
- My player moves strangely, it does not really follow the camera
If you have issues with the player's movement, in particular, if it's not aligned with the camera, this can mean that a node is offset or rotated in the player scene while it shouldn't.
Review the Player and Camera3D nodes in the player scene. In the Inspector, locate the Transform
Position property. A position on the X axis that is not zero means that the node is offset left or right relative to its parent. And a value that is not zero on the Z axis means that the node is offset forward or back relative to its parent. Also, make sure that the Transform
Rotation of both nodes is also set to (0, 0, 0) in the Inspector. If either node is rotated, this will affect the movement calculations in code. More generally, review the checkpoint in each section to help you identify what might be wrong and what the needed values for this project are.
Checkpoint
In the Project
- Code Reference: res://player/player.gd
Here's the complete code for the script at the end of part 4:
extends CharacterBody3D


func _unhandled_input(event):
	if event is InputEventMouseMotion:
		rotation_degrees.y -= event.relative.x * 0.5
		%Camera3D.rotation_degrees.x -= event.relative.y * 0.2
		%Camera3D.rotation_degrees.x = clamp(
			%Camera3D.rotation_degrees.x, -60.0, 60.0
		)
	elif event.is_action_pressed("ui_cancel"):
		Input.set_mouse_mode(Input.MOUSE_MODE_VISIBLE)


func _physics_process(delta):
	const SPEED = 5.5

	var input_direction_2D = Input.get_vector(
		"move_left", "move_right", "move_forward", "move_back"
	)
	var input_direction_3D = Vector3(
		input_direction_2D.x, 0, input_direction_2D.y
	)
	var direction = transform.basis * input_direction_3D

	velocity.x = direction.x * SPEED
	velocity.z = direction.z * SPEED

	move_and_slide()
5. Jump and fall
Checkpoint
In the Project1920 and the Viewport Height is set to 1080. Also, the Stretch
- Code Reference: res://player/player.gd
Here's the complete code for the script at the end of part 4. I highlighted the new lines of code for the jump mechanic:
extends CharacterBody3D


func _unhandled_input(event):
	if event is InputEventMouseMotion:
		rotation_degrees.y -= event.relative.x * 0.5
		%Camera3D.rotation_degrees.x -= event.relative.y * 0.2
		%Camera3D.rotation_degrees.x = clamp(
			%Camera3D.rotation_degrees.x, -60.0, 60.0
		)
	elif event.is_action_pressed("ui_cancel"):
		Input.set_mouse_mode(Input.MOUSE_MODE_VISIBLE)


func _physics_process(delta):
	const SPEED = 5.5

	var input_direction_2D = Input.get_vector(
		"move_left", "move_right", "move_forward", "move_back"
	)
	var input_direction_3D = Vector3(
		input_direction_2D.x, 0, input_direction_2D.y
	)
	var direction = transform.basis * input_direction_3D

	velocity.x = direction.x * SPEED
	velocity.z = direction.z * SPEED

+	velocity.y -= 20.0 * delta
+	if Input.is_action_just_pressed("jump") and is_on_floor():
+		velocity.y = 10.0
+	elif Input.is_action_just_released("jump") and velocity.y > 0.0:
+		velocity.y = 0.0

	move_and_slide()
6. Creating the level
Checkpoint
In the game scene, all the CSGBox3D nodes have their Use Collision property turned on in the Inspector
7. Coding the Shooting mechanics
Checkpoint
Correction: In the video, in the bullet scene, we turn the Projectile node 90 degrees on the Y axis to make it face forward. However, due to how the bullet is coded, it ends up facing backwards.
This is not very noticeable when playing so it's fine to leave it as-is, but in the checkpoint below I've corrected the angle value to -90 degrees to make the projectile model face the right way.
Nathan
Founder and teacher at GDQuest
At the end of this section, you should be able to verify that:
In the player scene, there is no leftover bullet
In the bullet scene, the child Projectile has its Transform
- Code Reference: res://player/bullet_3d.gd
Here's the complete code for the script at the end of part 7:
extends Area3D

const SPEED = 55.0
const RANGE = 40.0

var travelled_distance = 0.0


func _physics_process(delta):
	position += transform.basis.z * SPEED * delta
	travelled_distance += SPEED * delta
	if travelled_distance > RANGE:
		queue_free()
- Code Reference: res://player/player.gd
Here's the player script, . I highlighted the new lines of code for the shooting mechanic:
extends CharacterBody3D


func _unhandled_input(event):
	if event is InputEventMouseMotion:
		rotation_degrees.y -= event.relative.x * 0.5
		%Camera3D.rotation_degrees.x -= event.relative.y * 0.2
		%Camera3D.rotation_degrees.x = clamp(
			%Camera3D.rotation_degrees.x, -60.0, 60.0
		)
	elif event.is_action_pressed("ui_cancel"):
		Input.set_mouse_mode(Input.MOUSE_MODE_VISIBLE)


func _physics_process(delta):
	const SPEED = 5.5

	var input_direction_2D = Input.get_vector(
		"move_left", "move_right", "move_forward", "move_back"
	)
	var input_direction_3D = Vector3(
		input_direction_2D.x, 0, input_direction_2D.y
	)
	var direction = transform.basis * input_direction_3D

	velocity.x = direction.x * SPEED
	velocity.z = direction.z * SPEED

	velocity.y -= 20.0 * delta
	if Input.is_action_just_pressed("jump") and is_on_floor():
		velocity.y = 10.0
	elif Input.is_action_just_released("jump") and velocity.y > 0.0:
		velocity.y = 0.0

	move_and_slide()

+	if Input.is_action_pressed("shoot") and %Timer.is_stopped():
+		shoot_bullet()


+func shoot_bullet():
+	const BULLET_3D = preload("res://player/bullet_3d.tscn")
+	var new_bullet = BULLET_3D.instantiate()
+	%Marker3D.add_child(new_bullet)
+
+	new_bullet.transform = %Marker3D.global_transform
+
+	%Timer.start()
- In the bullet scene, I don't see the bullet's two grey surfaces as in the video. I only see one gray shell.
Before we add the colors to the bullet mesh, the different meshes can be a bit difficult to see depending on the shading applied to the scene.
If when loading a mesh, you don't really see highlights and shadows on it, double check that the Toggle preview sunlight and Toggle preview environment icons are activated in the toolbar above the viewport.
These two icons control the scene's preview lighting. If they are turned off, the scene will have no lighting and will generally turn a bit dark gray (unless it's a game level and it contains light nodes), which makes it hard to see the different meshes.
8. Creating the mob
Checkpoint
- Code Reference: res://mob/bat/bat_model.gd
Here's the complete code for the script at the end of this section:
extends Node3D

@onready var animation_tree = %AnimationTree

func hurt():
	animation_tree.set("parameters/OneShot/request", true)
- Code Reference: res://mob/mob.gd
Here is the mob script, :
extends RigidBody3D

@onready var bat_model = %bat_model

func take_damage():
	bat_model.hurt()
- Code Reference: res://player/bullet_3d.gd
Finally, here's the updated bullet script, :
extends Area3D

const SPEED = 55.0
const RANGE = 40.0

var travelled_distance = 0.0


func _physics_process(delta):
	position += transform.basis.z * SPEED * delta
	travelled_distance += SPEED * delta
	if travelled_distance > RANGE:
		queue_free()


func _on_body_entered(body):
	queue_free()
	if body.has_method("take_damage"):
		body.take_damage()
9. Getting the mob to follow the player
- After creating an animation tree node I do not see the animation tree panel
In Godot 4.4, there's a bug where when creating an AnimationTree node, the AnimationTree bottom panel does not automatically expand. You have to open it manually by clicking the AnimationTree label at the bottom of the editor.
Checkpoint
- Code Reference: res://mob/mob.gd
Here's the complete code for the script at the end of this section. I highlighted the new lines of code for the mob to follow the player:
extends RigidBody3D

+var speed = randf_range(2.0, 4.0)

@onready var bat_model = %bat_model

+@onready var player = get_node("/root/Game/Player")


+func _physics_process(delta):
+	var direction = global_position.direction_to(player.global_position)
+	direction.y = 0.0
+	linear_velocity = direction * speed
+	bat_model.rotation.y = Vector3.FORWARD.signed_angle_to(direction, Vector3.UP) + PI


func take_damage():
	bat_model.hurt()
10. Damaging and killing the mob
- Why the bat rotates if you touch it
In this game, we use a RigidBody3D node for mobs (for the bat). A RigidBody3D is largely controlled by the physics engine and you influence it through collisions and forces.
By default, a rigid body 3D node is set to automatically rotate under the influence of impacts and forces. When you collide with a bat with the player character this creates an impact that causes the bat to start spinning. The same happens when bats collide with one another.
It's a behavior that we want when killing a bat because we want it to roll on the floor and rolling on the floor is powered by the same system.
For simplicity in the video, we keep the rotation by default, but if you want to suppress this behavior while the bats are flying around, you can lock the mob's rotation by turning on the Deactivation
Lock Rotation property of the RigidBody3D node (the Mob node) in the Inspector. 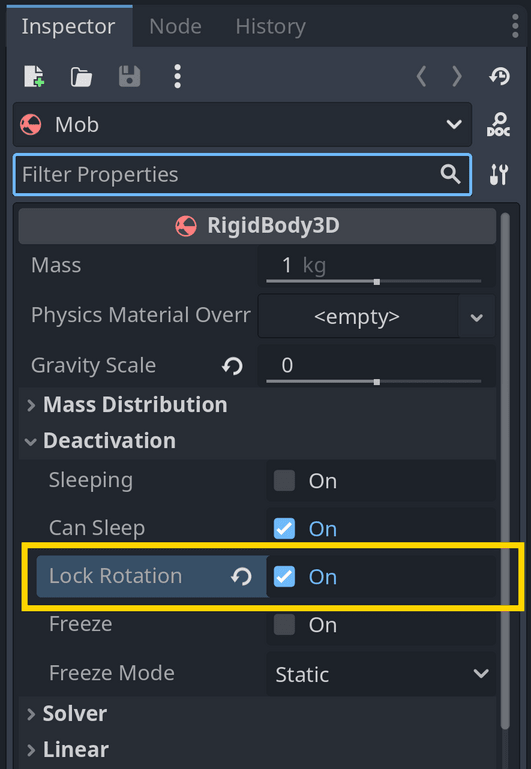
This will, however, cause the bats not to roll anymore when killing them. So to make them roll upon dying, in the script, you need to add a line of code to remove rotation lock. You can add the following lines at the end of the
take_damage()function for that:func take_damage(): if health <= 0: return bat_skin.hurt() health -= 1 hurt_sound.pitch_scale = randfn(1.0, 0.1) hurt_sound.play() if health == 0: set_physics_process(false) gravity_scale = 1.0 var direction_back = player.global_position.direction_to(global_position) var random_upward_force = Vector3.UP * randf() * 5.0 apply_central_impulse(direction_back.rotated(Vector3.UP, randf_range(-0.2, 0.2)) * 10.0 + random_upward_force) timer.start() + lock_rotation = false
Checkpoint
In the mob scene, the Timer node is set to One Shot
The Timer node's timeout signal is connected to the Mob node's _on_timer_timeout function
- Code Reference: res://mob/mob.gd
Here's the complete code for the script at the end of this section. I highlighted the new lines of code for the mob to follow the player:
extends RigidBody3D

+var health = 3
var speed = randf_range(2.0, 4.0)

@onready var bat_model = %bat_model
@onready var timer = %Timer

@onready var player = get_node("/root/Game/Player")


func _physics_process(delta):
	var direction = global_position.direction_to(player.global_position)
	direction.y = 0.0
	linear_velocity = direction * speed
	bat_model.rotation.y = Vector3.FORWARD.signed_angle_to(direction, Vector3.UP) + PI


func take_damage():
+	if health <= 0:
+		return

	bat_model.hurt()

+	health -= 1
+
+	if health == 0:
+		set_physics_process(false)
+		gravity_scale = 1.0
+		var direction = player.global_position.direction_to(global_position)
+		var random_upward_force = Vector3.UP * randf() * 5.0
+		apply_central_impulse(direction.rotated(Vector3.UP, randf_range(-0.2, 0.2)) * 10.0 + random_upward_force)
+		timer.start()


+func _on_timer_timeout():
+	queue_free()
11. Spawning the mobs continuously from spawners
- Code Reference: res://mob/spawner_3d.gd
Here's the complete code for the script at the end of this section. I highlighted the new lines of code for the mob to follow the player:
NOTE:The reference to the Timer node is unused in the script. You can remove it if you want to keep your code free of unused references. I still included it here to match the video.extends Node3D @export var mob_to_spawn: PackedScene = null @onready var marker_3d = $Marker3D @onready var timer = %Timer func _on_timer_timeout(): var new_mob = mob_to_spawn.instantiate() add_child(new_mob) new_mob.global_position = marker_3d.global_position
12. Scoring
Checkpoint
In the game scene, the MobSpawner3D node's mob_spawned signal is connected to the Game node
- Code Reference: res://mob/spawner_3d.gd
Here's the complete code for the script at the end of this section. I highlighted the new lines of code to emit a signal when a mob spawns.
NOTE:The reference to the Timer node is unused in the script. You can remove it if you want to keep your code free of unused references. I still included it here to match the video.extends Node3D +signal mob_spawned(mob) @export var mob_to_spawn: PackedScene = null @onready var marker_3d = $Marker3D @onready var timer = %Timer func _on_timer_timeout(): var new_mob = mob_to_spawn.instantiate() add_child(new_mob) new_mob.global_position = marker_3d.global_position + mob_spawned.emit(new_mob)
- Code Reference: res://mob/mob.gd
Here's the updated mob script, , with the new lines to track death and emit a signal:
extends RigidBody3D

signal died

var health = 3
var speed = randf_range(2.0, 4.0)

@onready var bat_model = %bat_model
@onready var timer = %Timer

@onready var player = get_node("/root/Game/Player")


func _physics_process(delta):
	var direction = global_position.direction_to(player.global_position)
	direction.y = 0.0
	linear_velocity = direction * speed
	bat_model.rotation.y = Vector3.FORWARD.signed_angle_to(direction, Vector3.UP) + PI


func take_damage():
	if health <= 0:
		return

	bat_model.hurt()

	health -= 1

	if health == 0:
		set_physics_process(false)
		gravity_scale = 1.0
		var direction = player.global_position.direction_to(global_position)
		var random_upward_force = Vector3.UP * randf() * 5.0
		apply_central_impulse(direction.rotated(Vector3.UP, randf_range(-0.2, 0.2)) * 10.0 + random_upward_force)
		timer.start()

+		died.emit()


func _on_timer_timeout():
	queue_free()
- Code Reference: res://game.gd
Here's the game script, :
extends Node3D

var player_score = 0

@onready var label := %Label


func increase_score():
	player_score += 1
	label.text = "Score: " + str(player_score)


func _on_mob_spawner_3d_mob_spawned(mob):
	mob.died.connect(increase_score)
13. Adding sounds
Checkpoint
In the player scene, there is an AudioStreamPlayer node (which plays at a constant volume), and in the mob scene, there are AudioStreamPlayer3D nodes for the hurt and KO sounds (so their volume fades with the distance to the player)
- Code Reference: res://player/player.gd
And here's the player script, . I highlighted the added line of code for playing the shooting sound:
extends CharacterBody3D


func _unhandled_input(event):
	if event is InputEventMouseMotion:
		rotation_degrees.y -= event.relative.x * 0.5
		%Camera3D.rotation_degrees.x -= event.relative.y * 0.2
		%Camera3D.rotation_degrees.x = clamp(
			%Camera3D.rotation_degrees.x, -60.0, 60.0
		)
	elif event.is_action_pressed("ui_cancel"):
		Input.set_mouse_mode(Input.MOUSE_MODE_VISIBLE)


func _physics_process(delta):
	const SPEED = 5.5

	var input_direction_2D = Input.get_vector(
		"move_left", "move_right", "move_forward", "move_back"
	)
	var input_direction_3D = Vector3(
		input_direction_2D.x, 0, input_direction_2D.y
	)
	var direction = transform.basis * input_direction_3D

	velocity.x = direction.x * SPEED
	velocity.z = direction.z * SPEED

	velocity.y -= 20.0 * delta
	if Input.is_action_just_pressed("jump") and is_on_floor():
		velocity.y = 10.0
	elif Input.is_action_just_released("jump") and velocity.y > 0.0:
		velocity.y = 0.0

	move_and_slide()

	if Input.is_action_pressed("shoot") and %Timer.is_stopped():
		shoot_bullet()


func shoot_bullet():
	const BULLET_3D = preload("res://player/bullet_3d.tscn")
	var new_bullet = BULLET_3D.instantiate()
	%Marker3D.add_child(new_bullet)

	new_bullet.transform = %Marker3D.global_transform

	%Timer.start()
+	%AudioStreamPlayer.play()
- Code Reference: res://mob/mob.gd
Here's the updated mob script, , with the lines of code to play the hurt and KO sounds highlighted:
extends RigidBody3D

signal died

var health = 3
var speed = randf_range(2.0, 4.0)

@onready var bat_model = %bat_model
@onready var timer = %Timer

@onready var player = get_node("/root/Game/Player")

+@onready var hurt_sound = %HurtSound
+@onready var ko_sound = %KOSound


func _physics_process(delta):
	var direction = global_position.direction_to(player.global_position)
	direction.y = 0.0
	linear_velocity = direction * speed
	bat_model.rotation.y = Vector3.FORWARD.signed_angle_to(direction, Vector3.UP) + PI


func take_damage():
	if health <= 0:
		return

	bat_model.hurt()

	health -= 1
+	hurt_sound.play()

	if health == 0:
+		ko_sound.play()

		set_physics_process(false)
		gravity_scale = 1.0
		var direction = player.global_position.direction_to(global_position)
		var random_upward_force = Vector3.UP * randf() * 5.0
		apply_central_impulse(direction.rotated(Vector3.UP, randf_range(-0.2, 0.2)) * 10.0 + random_upward_force)
		timer.start()

		died.emit()

func _on_timer_timeout():
	queue_free()
14. Setting up the kill plane
Checkpoint
The KillPlane node's body_entered signal is connected to the Game node (not its area_entered signal, which wouldn't detect the player)
- Code Reference: res://game.gd
Here's the game script, , with the new function for the kill plane highlighted:
extends Node3D

var player_score = 0

@onready var label := %Label


func increase_score():
	player_score += 1
	label.text = "Score: " + str(player_score)


func _on_mob_spawner_3d_mob_spawned(mob):
	mob.died.connect(increase_score)


+func _on_kill_plane_body_entered(body):
+	get_tree().reload_current_scene.call_deferred()
15. Adding visual effects and refining the level
Checkpoint
In the mob scene, the Mob node's Collision
- Code Reference: res://game.gd
Here's the game script, , at the end of this section. I highlighted the lines to draw the mob's VFX.
extends Node3D

var player_score = 0

@onready var label := %Label


func increase_score():
	player_score += 1
	label.text = "Score: " + str(player_score)


+func do_poof(mob_position):
+	const SMOKE_PUFF = preload("res://mob/smoke_puff/smoke_puff.tscn")
+	var poof := SMOKE_PUFF.instantiate()
+	add_child(poof)
+	poof.global_position = mob_position


func _on_mob_spawner_3d_mob_spawned(mob):
-	mob.died.connect(increase_score)
+	mob.died.connect(func():
+		increase_score()
+		do_poof(mob.global_position)
+	)
+	do_poof(mob.global_position)


func _on_kill_plane_body_entered(body):
	get_tree().reload_current_scene.call_deferred()
- Code Reference: res://mob/mob.gd
And here's the updated mob script, :
extends RigidBody3D

signal died

var health = 3
var speed = randf_range(2.0, 4.0)

@onready var bat_model = %bat_model
@onready var timer = %Timer

@onready var player = get_node("/root/Game/Player")

@onready var hurt_sound = %HurtSound
@onready var ko_sound = %KOSound


func _physics_process(delta):
	var direction = global_position.direction_to(player.global_position)
	direction.y = 0.0
	linear_velocity = direction * speed
	bat_model.rotation.y = Vector3.FORWARD.signed_angle_to(direction, Vector3.UP) + PI


func take_damage():
	if health <= 0:
		return

	bat_model.hurt()

	health -= 1
	hurt_sound.play()

	if health == 0:
		ko_sound.play()

		set_physics_process(false)
		gravity_scale = 1.0
		var direction = player.global_position.direction_to(global_position)
		var random_upward_force = Vector3.UP * randf() * 5.0
		apply_central_impulse(direction.rotated(Vector3.UP, randf_range(-0.2, 0.2)) * 10.0 + random_upward_force)
		timer.start()

-		died.emit()

func _on_timer_timeout():
	queue_free()
+	died.emit()
16. Exporting the game
Download files
Updates / Code patches
- This learning resource was created with Godot 4.2 and updated to Godot 4.4
- No errors have been reported. REPORT AN ERROR
Bonus
You can go a lot further with this game. After completing the tutorial, the challenges below will help you improve your skills and make the game your own.
Remember that programming is a skill and you will only improve if you copy, customize, and then create.
We prepared some challenges to help you get started, experimenting and making the project yours. They come with hints and a solution to compare against in the solutions version of the Godot project files you downloaded.
The challenges will take research and experimentation. Each of them comes with hints that help you one step of the way at a time.
These challenges are, well, challenging! You will need to research and help each other to beat them. If you can't beat them, no worries! The bulk of the learning and skill improvement happens when you work hard and try to implement mechanics and search for a solution. You can always come back to the challenges later when you have more experience.
Nathan
Founder and teacher at GDQuest
- How do I know if I beat a challenge or if my code is a valid solution?
In programming, there are often many ways to achieve the same result. When you're getting started, as long as your result looks similar to the challenge video example, you're all good. The challenge is in getting the result in the game, not writing the code in a specific way.
Writing code that is as simple as can be will come with experience.
Challenge
Add a time limit to the game, this is the time the player needs to survive. Display the remaining time centered at the top of the screen.
If the player stays alive all the time, display a message centered on the screen to congratulate them.
The final result should look something like this:
Check out the get_tree().paused property to pause the game when it ends.
timeout
signal to know when the time ran out and want to display the end text.
timeout
signal once.
get_tree().paused
property.
Challenge
Add a health bar and make the player take damage when colliding with the bats.
The results should look something like this:
If you've watched the tutorial Your First 2D Game with Godot 4 before, the principle behind this challenge is similar to the player health in the 2D tutorial. However, some of the required code will be different because this is 3D and the mobs are RigidBody3D nodes.
- Pausing the game in Godot
Godot has built-in properties to pause the game and control what the player can do while the game is paused.
Pausing the game with get_tree().paused
To pause the game, you need to:
- Get the game's scene tree (it's the object that manages all the nodes in your game) by calling
get_tree(). - Change the
pausedproperty of the scene tree totrue.
get_tree().paused = trueTo unpause the game, you set the scene tree's
pausedproperty tofalse.get_tree().paused = falseBy default, this pauses all nodes in your game, which will prevent the player from doing anything, including navigating a pause menu or unpausing the game.
To control which nodes pause and which continue running, you need to change the process mode property of the nodes you want to control.
Keeping nodes active while the game is paused
When you select a node, if you scroll to the bottom of the Inspector dock, you will see the property Process
Mode . By default, it's set to Inherit, which means the node will inherit the pause behavior from its parent node. By default, the root of the scene tree is paused when the game is paused and that's why all nodes in the game are paused.
You can set a node's Process
Mode to Always instead to keep it and all its children running while the game is paused. You can do this for the root node of a pause menu or a game over menu, for example, to keep it interactive while the game is paused.
Here's how to do it in code:
func _ready() -> void:
	# This code keeps the node to which the script is attached running while the
	# game is paused.
	process_mode = Node.PROCESS_MODE_ALWAYS
Toggling pause with a key
You can toggle the game's pause state by checking if a key is pressed in the
_input()function.func _input(event: InputEvent) -> void: if event.is_action_pressed("toggle_pause"): get_tree().paused = not get_tree().pausedIn this code, we:
- Check if the input action
"toggle_pause"is pressed. Doing this in the_input()function allows you to catch input events before the user interface and other nodes in the scene. - Toggle the game's pause state by setting the scene tree's
pausedproperty to the opposite of its current value. If the game is paused, thepausedproperty will betrue, and writingnotbefore it will set it tofalse, and vice versa.
NOTE:You'll need to register the input action"toggle_pause"in the project settings for this code to work. Go to ProjectProject Settings... Input Map to register an input action. - Get the game's scene tree (it's the object that manages all the nodes in your game) by calling
- Isn't it redundant to call get_tree() multiple times? And doesn't it affect performance?
In GDScript, calling functions like
get_tree()is a very cheap operation. Calling an engine's built-in function like this is surprisingly much faster than calling a function you would write yourself in the same script.The engine is optimized to handle these calls efficiently. So you don't need to worry about performance when calling built-in functions like
get_tree()multiple times in a script, especially not as a beginner.When you gain experience and start working on performance-intensive code, you can start measuring the performance of different parts of your code.